
Salesforce Setup Guide
Connect your Salesforce org to Partner.io so approved leads flow into Salesforce automatically, and updates you make in Salesforce flow back to Partner.io.
Who should do this: a Salesforce administrator, with permission to install packages, edit user permissions, change page layouts, and enable Change Data Capture.
How long it takes: 20 to 30 minutes, plus deciding which user to connect with (Step 2).
Supported editions: Enterprise, Unlimited, and Performance. Professional Edition needs API access enabled by Salesforce first. Developer Edition works for testing.
Contents
Before you begin
What the integration does
Once connected, Partner.io will create a Lead in Salesforce for each approved lead, record which Partner and Partner Rep referred it, and watch for changes you make in Salesforce (status changes, conversions, closed deals) to reflect them back in Partner.io.
Where the referring partner is recorded
Partner.io records the partner organisation that referred a lead and the individual at that partner, on both the Lead and any Opportunity it converts to. Both are written as links to real records in your org: an Account for the organisation, a Contact for the individual.
By default these go into two custom fields the package installs:
Field | Type |
|---|---|
Referring Partner (Partner.io) | Lookup to Account |
Referring Partner Rep (Partner.io) | Lookup to Contact |
This is the standard setup and needs no field building on your part. Follow every step, including the permission set at Step 4, which is what lets Partner.io write to those fields.
Using your own fields instead (optional)
If you already track referral sources on your own fields, you can point Partner.io at them in the field mappings at Step 8. Two things to know:
Your fields must accept a Salesforce record Id. We write an Account Id and a Contact Id, so a Lookup to Account and a Lookup to Contact are the natural fit. A text field holds the Id but loses the clickable link.
Remap both. The partner and partner rep are mapped separately. Remap only one and the other still writes to our field, so you still need the permission set.
Once both are remapped, our two fields go unused and Steps 4 and 6 become optional. Until then, treat them as required.
The order matters
Complete the steps in order, and install and configure before you connect. The connection will fail if the package is not installed first, because the app you authorise at Step 7 is delivered by the package.
What you will need
A Salesforce administrator login
Salesforce enabled on your Partner.io account (your Partner.io representative will confirm this)
The install link is in Step 1. Nothing needs requesting from us beforehand, and no installation key is required.
Step 1: Install the Partner.io package
The package adds the custom fields, the permission set, and the app Partner.io uses to talk to your org. It moves no data on its own.
Open the install link for your environment.
Production or Developer Edition org:
https://login.salesforce.com/packaging/installPackage.apexp?p0=04thm000000qMsTAAU
Sandbox org:
https://test.salesforce.com/packaging/installPackage.apexp?p0=04thm000000qMsTAAU
Use the link that matches the org. The only difference is
loginversustest. The wrong one sends you to the wrong org.
Sign in as an administrator if prompted. No installation key is required. If Salesforce asks for one, your link is out of date. Contact Partner.io for the current one.
Choose Install for Admins Only. Access for other users is granted through the permission set at Step 4.
Click Install and wait. Salesforce may say the install is taking a while and email you when it finishes. This is normal.
Confirm it installed
Under Setup → Apps → Packaging → Installed Packages, Partner.io should appear with the namespace partner_io.
Step 2: Choose the user you will connect with
This step has no clicks, but it is the most important decision here. When you connect, you sign in as a specific Salesforce user, and Partner.io then acts as that user with exactly that user's permissions. If the user cannot create Leads, neither can Partner.io.
Use a dedicated integration user if you can
We strongly recommend a Salesforce user created for integrations rather than a person's everyday account. If you connect as an employee who later leaves and is deactivated, the integration stops working, and weeks later the cause is far from obvious. A dedicated user also makes it clear in your audit history which records Partner.io created.
If you must use a personal account, pick someone unlikely to change roles or leave, and note the dependency somewhere your team will find it.
Connecting as a System Administrator
If you connect as a full System Administrator, that user already has everything the integration needs, and you can skip Step 3 entirely. You still need the permission set at Step 4 only if you want other users to see the Partner.io fields.
For any other user, continue to Step 3.
Step 3: Give the user the required permissions
Skip this if you are connecting as a System Administrator.
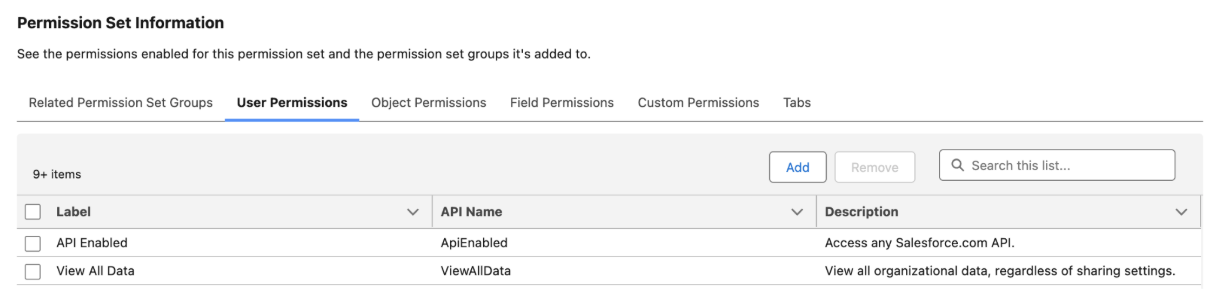
The user you connect with needs these, through their profile or a permission set:
API Enabled, required for any integration to connect
View All Data, which grants read access across your org and is required for the notes and files sync (see the note below)
Create and Edit on Lead, Opportunity, Account, and Contact, the objects Partner.io creates and updates
Read access to everything else is covered by View All Data, so you do not grant object read permissions one by one.
Why View All Data? At Step 5 you enable Change Data Capture for Content Document, which is how Partner.io picks up notes and files attached to your records. Content Document changes are not tied to a single object, and Salesforce only exposes them to users with View All Data. Without it, everything else works but notes and attached files never reach Partner.io, with no error to indicate why.
The exact settings, with screenshots, are in Reference: required permissions.
Step 4: Assign the Partner.io permission set
Skip this only if you have remapped both partner fields to your own
The package ships a permission set, PartnerIoPermissions, that grants access to the two custom fields. This is separate from the permissions in Step 3: those let the user work with Salesforce records, this one lets them read and write the specific Partner.io fields. A System Administrator has this field access already; any other user needs the permission set, or the referring partner silently fails to record.
Go to Setup → Users → Permission Sets
Click PartnerIoPermissions, then Manage Assignments → Add Assignment
Select the user from Step 2, then Assign
Assign it to any other user who needs to see the Partner.io fields on a record, not only the connected user.
Step 5: Enable Change Data Capture
Change Data Capture (CDC) is how Salesforce tells Partner.io when something changes in your org. Without it, Partner.io can write to Salesforce but never learns about your team's updates, so partner-facing progress goes stale.
Go to Setup → Integrations → Change Data Capture
Move each of these from Available Entities to Selected Entities:
Lead
Opportunity
Content Document (notes and files, for example a signed contract attached to a deal)
Click Save
Content Document also depends on the connected user having View All Data (Step 3).
Out of entity slots? The standard allocation limits how many objects you can select. If the three will not fit, deselect an object you no longer need, or ask Salesforce to increase your allocation. Partner.io needs all three to work fully.
Step 6: Add the Partner.io fields to your page layouts
Skip this if you have remapped both partner fields to your own.
This is about visibility, not function: Partner.io writes to the fields whether or not they are on a layout. The package installs two custom fields on Lead and Opportunity but does not place them, so your team will not see them until you do.
Field | What it holds |
|---|---|
Referring Partner (Partner.io) | The partner organisation that referred the lead |
Referring Partner Rep (Partner.io) | The individual at that partner who referred it |
For Lead and then Opportunity:
Go to Setup → Object Manager → [object] → Page Layouts
Open the layout your team uses
Drag both fields onto it, then Save
Repeat for each layout if you use different ones per record type or profile. You can also add the fields to list views and reports.
Step 7: Connect Partner.io
Only once the package is installed and Steps 2 to 6 are complete.
Find the Salesforce card and click Connect
If Salesforce is not shown or the button is unavailable, it is not enabled on your Partner.io account yet. Contact your Partner.io representative.
Choose the kind of org:
Choose
When
Production
Your live org, or a Developer Edition org
Sandbox
A sandbox org
Sandbox sign in details do not work against a production org, so the wrong choice means you cannot sign in. If unsure, you are almost certainly connecting Production.
Click Continue, and you will be sent to Salesforce.
Sign in as the user from Step 2, not necessarily as yourself. This is the most common mistake. If your browser signs you in as someone else, log out of Salesforce first or use a private window.
Approve access. Salesforce will mention Manage user data via APIs (read and write your records) and Perform requests at any time (keep syncing in the background). Click Allow.
You return to Partner.io with Salesforce shown as connected.
Step 8: Check everything is working
The settings
Click the cog icon on the Salesforce card to open the integration settings, where you configure sync settings and field mappings. If you are using your own Salesforce fields, this is where you point them. Choose the field in your org for each piece of partner information. If you are using our fields, the defaults already point at them and there is nothing to change.
End to end
Approve a lead in Partner.io
Within a short time it should appear as a Lead in Salesforce
Open it and confirm Referring Partner (Partner.io) is populated
Change the Lead status in Salesforce
Confirm the change appears back in Partner.io
If the Lead appears but changes do not flow back, check Change Data Capture (Step 5).
Troubleshooting
I cannot sign in during the connection step. Check which environment you chose. A sandbox username (usually ending in .sandboxname) cannot sign in to a production org, and vice versa. Disconnect and start again with the other option.
It signed me in as the wrong user. Salesforce reuses your browser session. Sign out of Salesforce completely or use a private window, then connect and sign in as your integration user.
I get an error about an invalid client. Contact Partner.io. This is a problem on our side, not your org, and reconnecting will not fix it.
The Partner.io fields are not visible on records. Check, in order: the fields are on the relevant page layout (Step 6), and the viewing user has the PartnerIoPermissions permission set (Step 4).
Leads are created, but my updates are not reaching Partner.io. Change Data Capture is likely not enabled for all three objects (Step 5).
Leads and status changes work, but notes and attached files do not. The connected user is missing View All Data, which Content Document CDC requires (Step 3).
The integration worked and has now stopped. Usually a change to the connected user. Confirm they are still active, still have PartnerIoPermissions, still have API Enabled and View All Data, and have not had permissions reduced. This is the failure a dedicated integration user avoids (Step 2).
Nothing above helps. Contact your Partner.io representative. It helps to include your Salesforce Org ID (Setup → Company Information → Salesforce.com Organization ID), whether the org is Production or Sandbox, the username you connected with, and roughly when it last worked.
Reference: required permissions
These are the permissions the connected user needs. Your profile or permission set names will differ, but the access must match. A System Administrator has all of this already.
System permissions
Permission | Why |
|---|---|
API Enabled | Required for any integration to connect and call the API |
View All Data | Grants read across the org, and is the only way to grant Change Data Capture on Content Document (notes and files), which is not tied to a single object |
Object permissions
Read access is covered by View All Data, so you only grant write access to the objects Partner.io creates and updates:
Object | Create | Edit |
|---|---|---|
Lead | Yes | Yes |
Opportunity | Yes | Yes |
Account | Yes | Yes |
Contact | Yes | Yes |
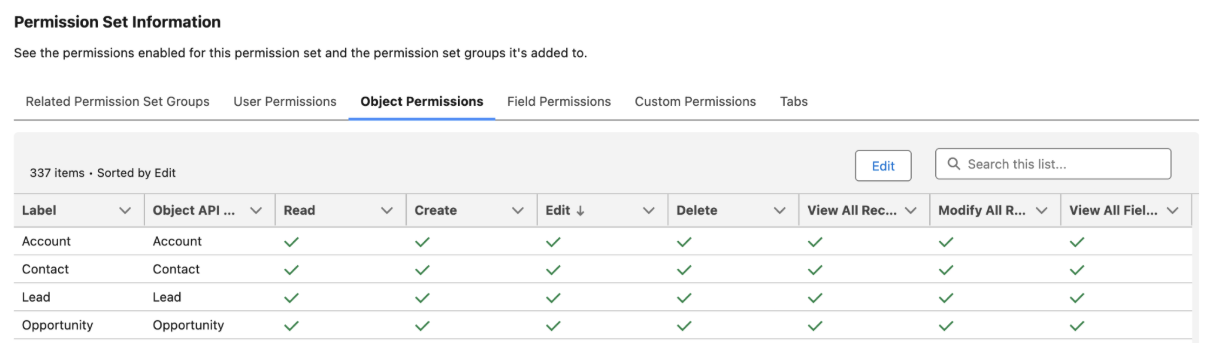
If your Leads or Opportunities can be owned by users other than the integration user, and you see permission errors on updates, grant Modify All on those objects so Partner.io can update records it does not own.
Reference: what the package installs
For administrators who want to know exactly what is added to their org.
Component | Type | Purpose | Required? |
|---|---|---|---|
| Lookup to Account, on Lead and Opportunity | Records the referring partner organisation | Used by default |
| Lookup to Contact, on Lead and Opportunity | Records the referring individual | Used by default |
| Permission set | Grants access to the two fields above | Required with the default mapping |
| External Client App | The app you authorise, letting Partner.io call the Salesforce API on your behalf | Always required |
The External Client App is always essential. The two fields are what Partner.io writes to unless you remap both to your own fields, and the permission set grants access to them. Only once both are remapped do the fields and permission set become unnecessary.
Everything installs under the partner_io namespace, so components appear prefixed in some screens, for example partner_io__PartnerIoPermissions. This is normal for managed packages. The package contains no Apex, triggers, or scheduled jobs, and does not modify your existing fields, layouts, or automation.
Removing the integration
To disconnect, click the disconnect icon on the Salesforce card in Partner.io. This revokes our access and stops all data exchange.
To also remove the package, uninstall it from Setup → Apps → Packaging → Installed Packages. Note that uninstalling deletes the two custom fields and the values in them, so the record of which partner referred each lead is removed from Salesforce. Salesforce offers to export that data during the uninstall, and we recommend accepting.
Was this helpful?