
Creating a Partner Referral Link
Get started with partner referral links and converting sign ups into leads
What Are Partner Referral Links?
Partner referral links are a powerful tool that allows you to track and manage leads generated through your partner network. You can create multiple links in the app and name them to organize them into campaigns, hint to the partner where they should be shared, or describe where they go (e.g., Facebook - Pricing Page, Spring Campaign - Landing Page, etc.).
Your partner reps share these links with their audience. When someone clicks on a link, it redirects them to your website. If the user signs up, a lead is created in your Partner.io account, and the partner rep who shared the link is credited with the lead.
How Do They Work?
When you create a partner referral link, each partner rep gets their own unique copy of that link. Each copy includes a unique Partner Link ID (plid) appended to it, like so:
https://app.partner.io/signup?plid=1234567890
The Partner Link Script
To track clicks and sign-ups, you need to add a small JavaScript snippet — the partner link script — to your website. Here's how it works:
Captures the Partner Link ID: The script reads the
plidfrom the URL when the user lands on the page.Stores the plid in the Browser: It saves the
plidusinglocalStorage, allowing it to persist across pages and even after the browser is closed and reopened.Tracks the Click: The script sends a click event to the Partner API when it initially captures the Partner Link ID.
Intercepts Form Submissions: When a user submits a sign-up form, the script automatically captures the form data and sends it — along with the Partner Link ID — to the Partner API to create a lead. Including the
plidallows us to attribute the lead to the exact referral link that drove the conversion.
Concepts To Understand
Each link is unique: The Partner Link ID is tied to the specific referral link, not the partner rep directly.
Click and sign-up attribution: Events like clicks and sign-ups are attributed to the partner link, and the resulting lead is attributed to the partner rep who owns that link.
Persistence across pages: Since the Partner Link ID is stored in
localStorage, it follows the user as they browse your site — meaning the sign-up form doesn't need to be on the same page the user originally landed on.Script placement is important:
The partner link script must be present on the page that the referral link directs to (so it can capture theplid).
It must also be present on any page where sign-up forms exist (so it can intercept form submissions).
Creating Links
To create a partner referral link, navigate to the Partner Toolkit section of the app and select Partner Referral Links. Click on the Create Link button and fill in the required fields, including the name of the link and where it goes.
Naming Your Links
When naming your links, consider the following:
Descriptive: Use a name that describes the purpose of the link, maybe where it should be shared and where it directs (e.g.,
Facebook - Pricing Page).Organized: Use a naming convention that helps you group similar links together (e.g.,
Spring Campaign - Landing Page).Unique: Ensure that each link has a unique name to avoid confusion.
Deleting Links
To delete a link, go to the Partner Referral Links section of the app and select the link you want to remove. Click the actions menu (three dots) next to the link and choose Delete. Confirm the deletion when prompted.
If the link has no clicks or leads associated with it, it will be permanently removed from your account. If it does have associated data, it will be deactivated instead — this ensures no data is lost.
The same behaviour applies to partner rep copies of the link:
If a partner rep's copy has no conversion data, it will be removed.
If it has associated clicks or leads, it will be deactivated but remain visible for historical reference.
Installing the Partner Link Script
There are a few different ways to install the Partner Link script on your website. The method you choose will depend on your website's setup and your preferences.
Install Method | When to Use |
|---|---|
Google Tag Manager | Use this method if you're using Google Tag Manager (GTM) and want a quick, no-code setup. This is the recommended option for most users. |
Google Tag Manager (Legacy) | This is our legacy GTM installation method. While still supported, it's not recommended for new users. If you're currently using this method, we recommend switching to GTM v2. |
Custom Install | Use this method if you're not using GTM and prefer to install the script directly on your site. This option requires some coding knowledge, as you'll need to manually update your website's code. It's also ideal if you want more fine-grained control over when events are recorded. |
Method 1: Google Tag Manager
This guide assumes that you already have Google Tag manager up and running but if not here's an extensive guide on how to get started.
Google Tag Manager (GTM) allows you to manage and deploy marketing tags (like tracking codes or scripts) on your website without needing to modify the source code directly. Below is a step-by-step guide on how to set up the Partner Link Tag using GTM.
Step 1: Create the Tag
Go to Google Tag Manager.
Create a GTM Account
If you don't already have an account, click Create Account. GTM allows you to create containers to organize your tags for different websites or web apps.
Create a Container
A container is a place where you store all your tags, triggers, and variables for a specific website or app. Each GTM container corresponds to a different website or web application that you're tracking. After creating an account, you'll be prompted to create a container. The container will hold all the tags for your website or web app.Add a New Tag
Once you have your container set up, the next step is to add a new tag. Click on Add a New Tag. You'll be taken to the Tag Configuration screen.
Configure the Tag
Click the Tag Configuration Box to choose the type of tag you want to create. Choose Custom HTML as the tag type and copy the following script into the tag configuration box.
<script src="https://widget.partner.io/partnerLink.js"></script><script>
  window.partnerLinkLibrary.init({{Form Element}});
</script>
Step 2: Trigger Setup
Click the Triggering Box to select a trigger for when the tag should fire.
Choose the All Pages Page View Trigger. This trigger ensures the script fires on all pages where it's included, which is necessary for tracking clicks.
What is a Trigger? A Trigger determines when and where a tag will fire. The Page View Trigger means that the tag will fire whenever a page is viewed.
Click the Plus Icon in the top-right of the Triggering section to add a new trigger.
Click the Plus Icon in the Choose a Trigger section to create a new trigger.
Click the Trigger Configuration Box and select Form Submission as the trigger type.
Why Form Submission Trigger? This trigger allows you to track form submissions, so the script will capture the form data and send it to the Partner API when it's submitted.
Configure Trigger Settings:
Check “Wait for Tags” and Check “Check Validation”.
GTM will show a warning:
You have selected Wait for Tags or Check Validation. We recommend enabling this trigger only on the pages where you need it and testing your changes before publishing.
This is expected — it's just a reminder to properly scope your trigger.
Step 3: Add Page Path Condition (before selecting "Some Forms")
In the section titled "Enable this trigger when all of these conditions are true", you'll see:
Variable:
Page PathOperator:
containsValue:
/your-page
Add one row per page you want to track forms on (e.g., /contact, /signup, /quote).
This ensures the trigger is only active on the pages you care about.
Step 3.1: Select “Some Forms” and Re-add Conditions
Now scroll to the section labelled:
Fire this trigger when an Event occurs and all of these conditions are true
Select Some Forms (instead of All Forms).
Add the same Page Path conditions here again:
Page Path→contains→/your-pageAdd multiple conditions as needed.
💡 Why repeat it?
GTM separates form events from page scoping, and both areas need conditions to ensure accurate and restricted triggering.
It should look something like this:
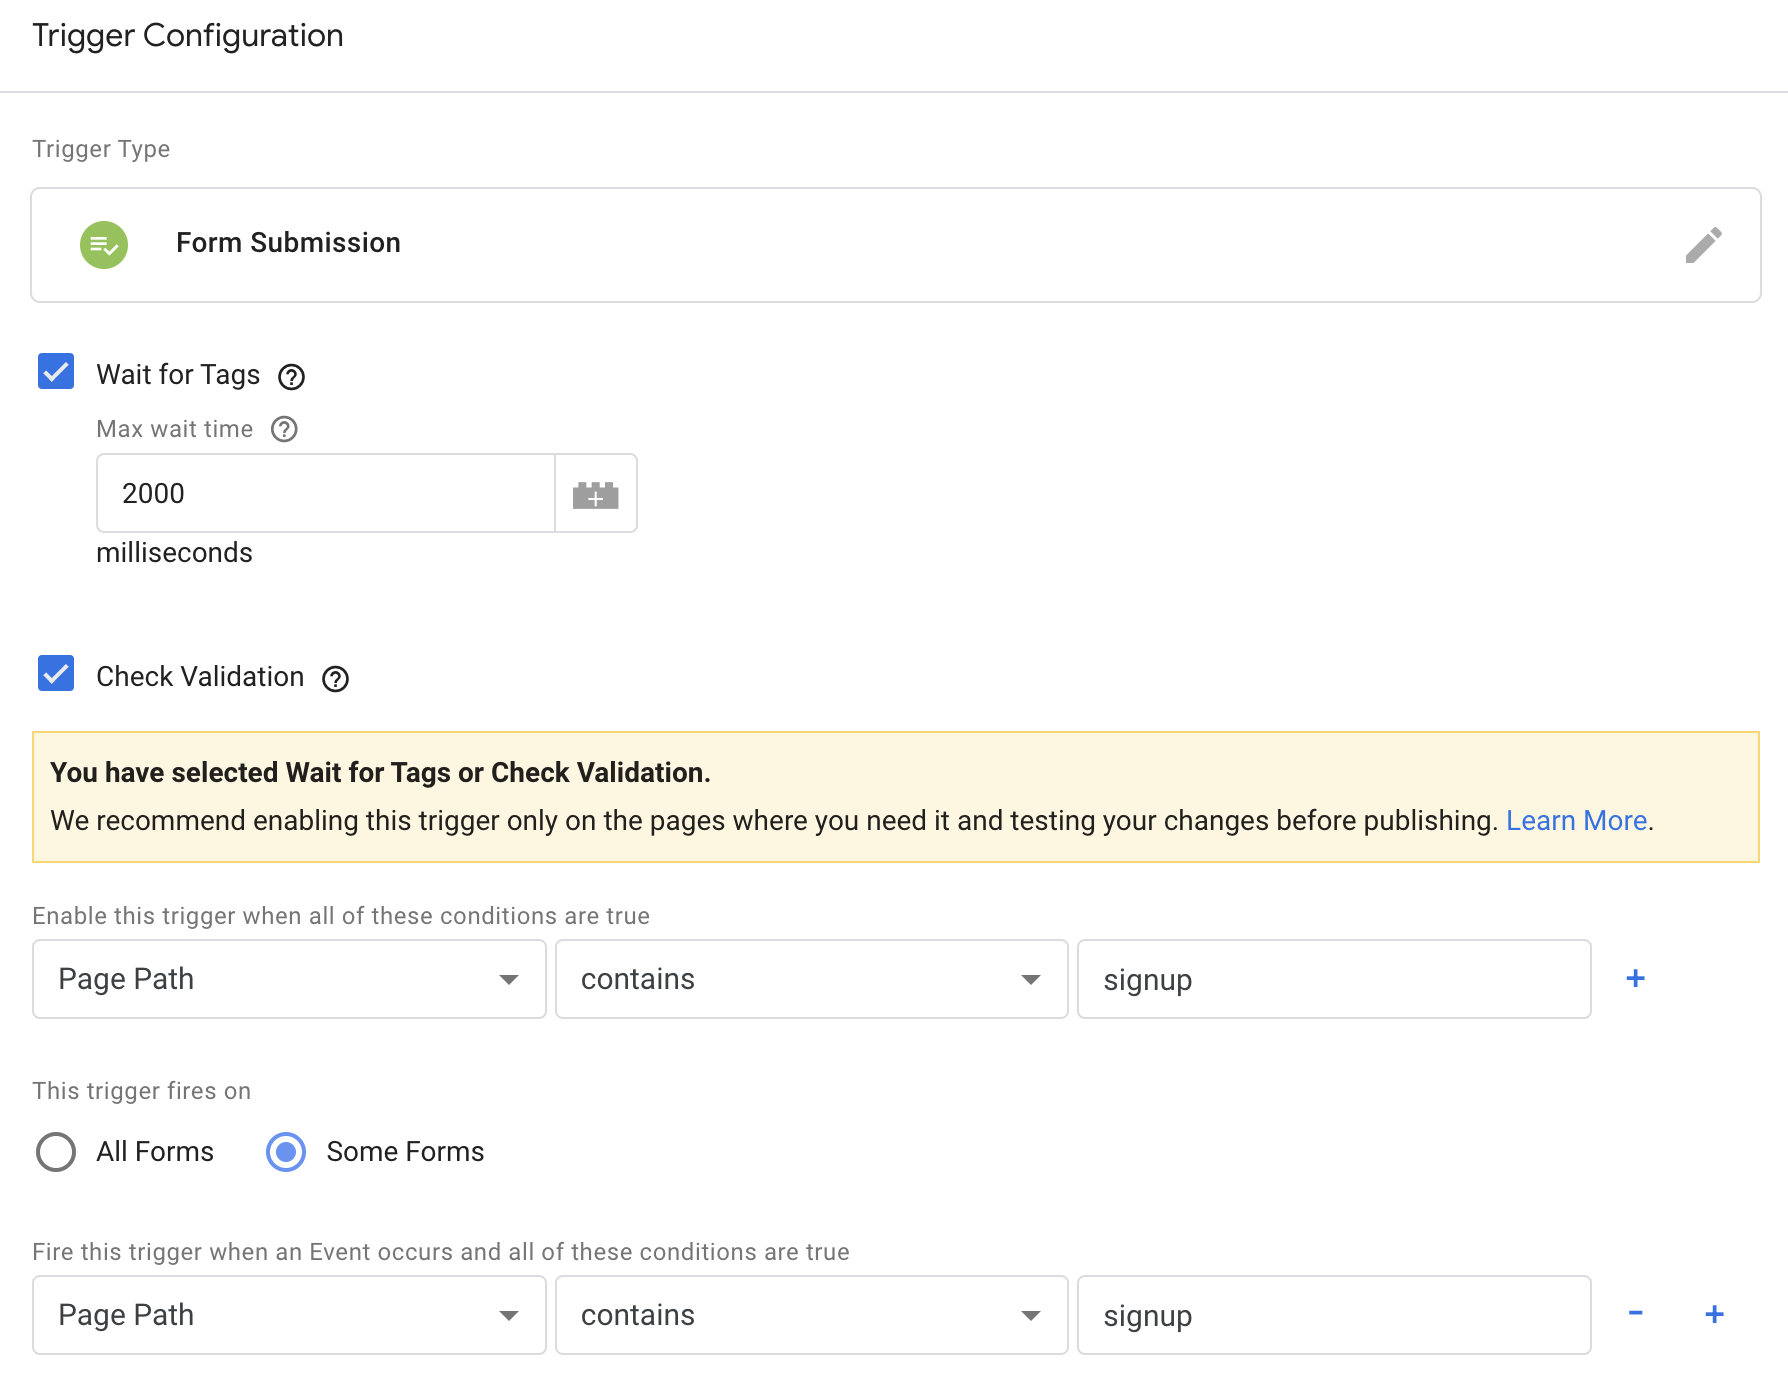
Name your trigger, e.g. Form Submission, and click Save.
Name the Tag
Once you've configured the tag and trigger, give the tag an appropriate name (e.g., Partner Link Tag), and click Save.
Adding the Form Element Variable
To complete the setup, you need to add the Form Element variable. This makes the form that was submitted available to the Partner Link script as a variable in GTM.
Why this is important
The script uses {{Form Element}} to access the form DOM node in real time when it's submitted. Without enabling this built-in variable, GTM won't be able to pass the form reference to the script, and tracking will not work.
Steps to Enable the Form Element Variable
In the left sidebar of GTM, click Variables.
Click the Configure button in the top-right of the Built-In Variables section.
In the checklist that appears, scroll down to the Forms section.
Check the box next to Form Element.
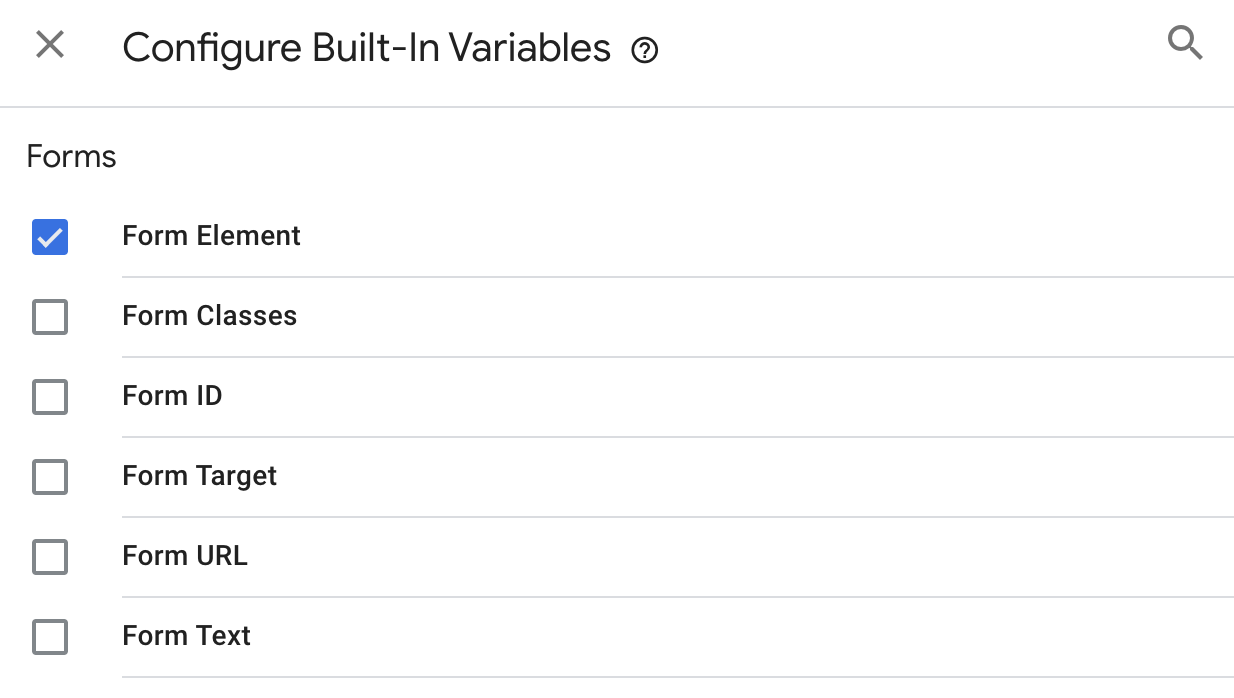
You should now see Form Element listed as an available built-in variable.
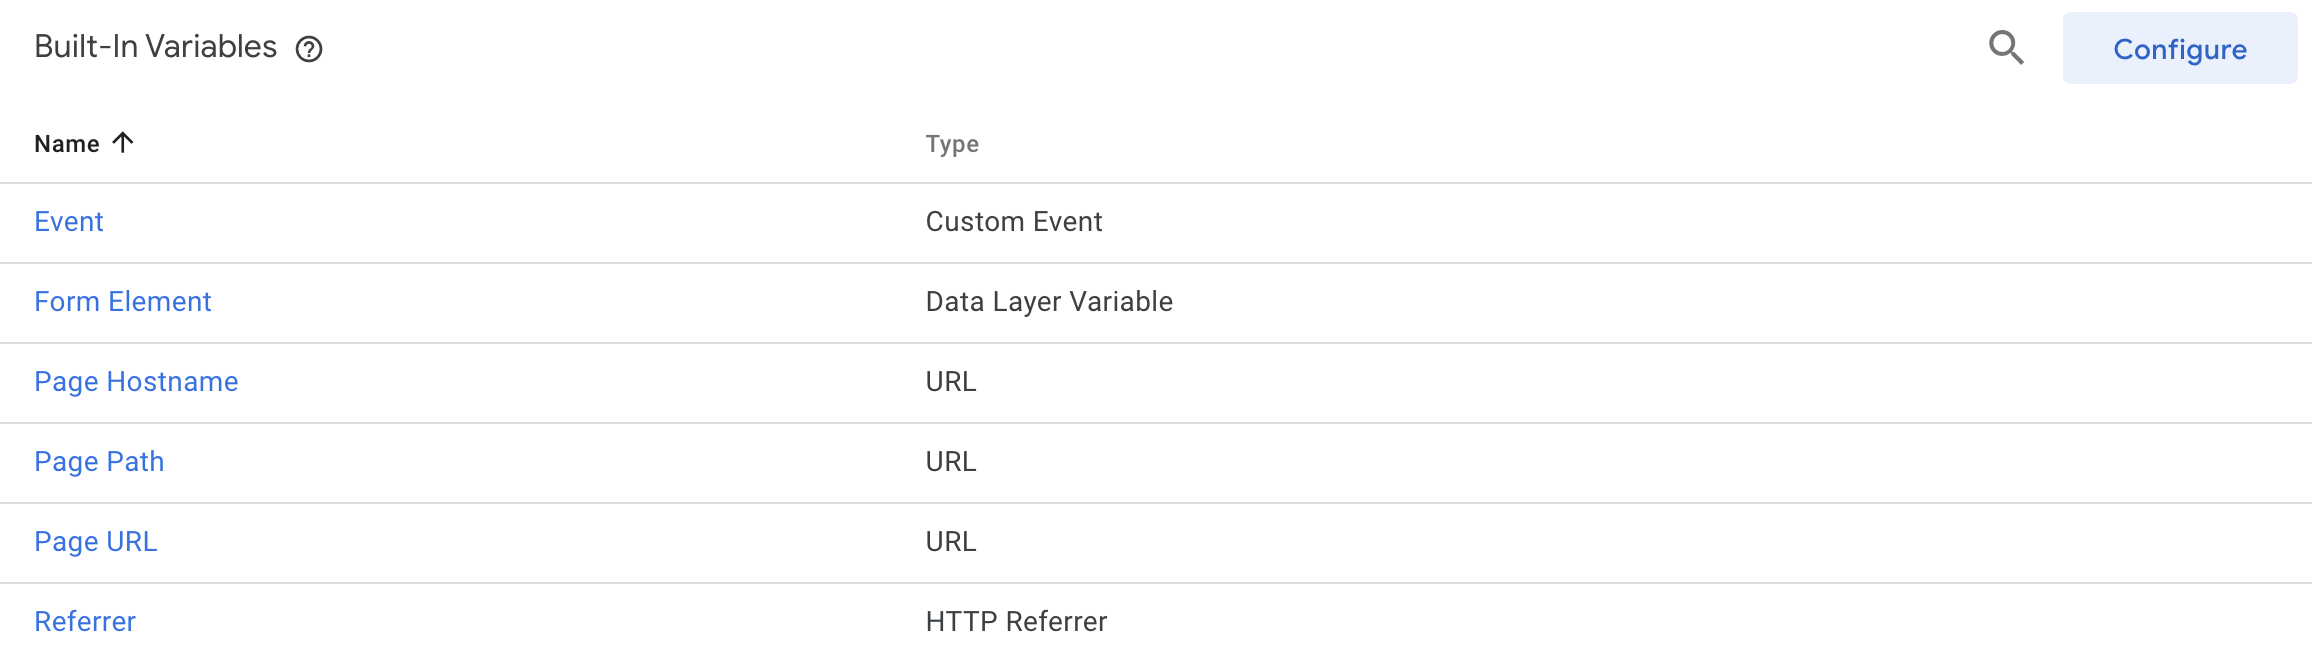
Step 4: Publish the Container
Once everything is configured, publish your changes to make the container live.
In the top-right corner of GTM, click Submit.
Add a version name (e.g.
Add Partner Link Tracking) and an optional description.Click Publish.
This will allow you to install the container on your website.
Load the Script
The tag — which includes the script — will be loaded on all pages where the GTM container is installed. To install the GTM container, you need to add the GTM code snippet to your website. Follow this guide for detailed instructions on how to do this.
Make sure the container is installed on:
All pages where the referral link directs to.
All pages where you want to track sign-ups.
Summary
You've created a Custom HTML tag with the Partner Link script.
You've set up two triggers:
One for All Pages (to capture link clicks).
One for Form Submissions (scoped to specific pages).
You've added the Form Element variable to pass the form DOM node to the script.
You've published the container to activate tracking.
And finally, you've added the GTM container code to your website 😎
You're now ready to start tracking clicks and sign-ups through your Partner Link setup using GTM!
⚠️ Important
If you're using standard HTML forms with anactionattribute, aPOSTmethod, and a page reload on submit, this setup will work seamlessly. These types of form submissions can be automatically tracked by GTM.However, if you're submitting forms via AJAX or JavaScript (e.g., using
fetch), the GTM form submission event will not fire. In this case, you'll need to manually send the sign-up data using the Partner Link JavaScript API.You can still use the GTM install method as described above. A manual install is only required when you're not using GTM. You'll just need to add some custom code to your form submission logic and call the recordSignUpEvent method from the Partner Link API to send the sign-up data.
For a detailed example of how to track AJAX-style form submissions see here.
Method 2: Google Tag Manager (Legacy)
This method is the legacy version of the Google Tag Manager installation. While it is still supported, we recommend using the newer GTM v2 method for all new implementations.
The GTM configuration is identical to the new method — the only difference is that this version uses the legacy script, which comes with more limitations.
<script>var partnerLinkId=new URLSearchParams(new URL({{Page URL}}).search).get("plid"),partnerLinkIdCookie=(document.cookie.match(/partner_link_id=([^;]*)/)||[null,null])[1];if(partnerLinkId&&(!partnerLinkIdCookie||partnerLinkId!==partnerLinkIdCookie)){document.cookie="partner_link_id="+partnerLinkId+"; Max-Age=2592000; SameSite=None; Secure; path=/",partnerLinkIdCookie=partnerLinkId;var setPartnerLinkIdCookie=!0}var signUpData=(window.dataLayer||[]).length&&"gtm.formSubmit"===window.dataLayer[window.dataLayer.length-1].event&&{{Form Element}}?Array.prototype.map.call({{Form Element}}.querySelectorAll("input"),(function(e,n){return{label:e.name||null,value:e.value}})):null;(setPartnerLinkIdCookie||(partnerLinkIdCookie||partnerLinkId)&&signUpData)&&fetch("http://api.partner.local:8000/tracking/partner-links",{method:"POST",headers:{"Content-Type":"application/json",Accept:"application/json"},body:JSON.stringify({partner_link_id:partnerLinkIdCookie||partnerLinkId,sign_up_data:signUpData,click_event:!!setPartnerLinkIdCookie})}).then((function(e){return e.json()})).catch((function(e){console.error("Error:",e)}));</script>Note: The legacy script only supports traditional (non-AJAX) form submissions. If you're submitting forms via AJAX or JavaScript (e.g., using
fetch), you'll need to use the newer GTM v2 method instead.The legacy script also relies on cookies to persist the Partner Link ID in the browser. This is less reliable, as many modern browsers restrict third-party scripts from setting cookies.
Additionally, it does not support the Partner Link JavaScript API, so it's recommended only if you're maintaining an older integration.
Method 3: Custom Install
This method is for users who prefer to install the Partner Link script directly on their website without using Google Tag Manager (GTM).
⚠️ This setup requires some coding knowledge, as you'll need to manually update your website's HTML and handle form tracking yourself.
Copy the Partner Link Script
You'll need to include the Partner Link script and initialize it manually.
<script src="https://widget.partner.io/partnerLink.js"></script>
<script>
  window.partnerLinkLibrary.init();
</script>
Add the Script to Your Website
Insert the script just before the closing tag on your website. Include it on every page which is the destination of a partner referral link. Include it on every page where you want to track sign-ups. This ensures the Partner Link JavaScript API is available wherever it's needed.
Hook into Form Submissions
Unlike the GTM setup — which automatically tracks form submissions — the custom install requires you to manually call the API when a form is submitted.
You'll use the Partner Link JavaScript API to send sign-up events to the Partner API in your form submission handler.
Example:
 type SignUpData = {
        label: string | null;
        value: string | null;
    }[];

    const onSubmit = async (values: SignUpData) => {
        await window.partnerLinkLibrary?.recordSignUpEvent(values);
        // Continue with your form submission logic
    };
See another example and the API documentation for recordSignUpEvent.
Testing the Partner Link Script
Partner.io will automatically check whether the Partner Link script is present on the destination page of each referral link. You can view the status of the script for every link inside the Partner Referral Links section of the app.
You can also manually verify that the script is loaded using your browser's Developer Console:
How to Check Manually
Open the Developer Console (usually by pressing
F12orCtrl + Shift + I).Go to the Console tab.
Type
window.partnerLinkLibraryand pressEnter.If the script is installed on the page, you should see an object with various methods and properties.
Troubleshooting
My form submissions are not being tracked"
Ensure that the Partner Link script is included on the page where the form is located.
If you're submitting forms via AJAX or JavaScript (e.g., using
fetch), make sure you're calling the recordSignUpEvent method from the Partner Link API in your form submission logic like this.
The click event is not being recorded
Ensure that the Partner Link script is included on the page where the partner referral link directs to.
Try enabling debug mode to see detailed logs of events and errors in the console.
The script is not being injected by Google Tag Manager
Make sure you have published the GTM container after adding the tag.
Turn off any ad blockers or browser extensions that might interfere with GTM.
Some browsers e.g. Brave block GTM by default. You may need to turn shields off for your site.
API
All API documentation can be found here
Was this helpful?